How to Purify Water Without Electricity (5 Methods)
How to Purify Water Without Electricity: A Hiker’s Practical Guide
The Problem
You’re three days into a backcountry trip, your water filter just clogged with sediment, and you’ve got another 8 miles to camp. Or maybe you’re planning an off-grid hiking adventure where you can’t rely on batteries or mechanical pumps. The reality? Most of us don’t carry backup water purification methods, and that’s a gap that could leave you dehydrated—or worse, dealing with giardia.
We learned this the hard way on a solo trip through the Cascades when my trusty Sawyer filter became unusable after accidentally freezing. We spent the next 12 hours boiling water in a battered titanium pot over a camp stove, which worked fine, but I realized I had no contingency plan beyond that. Since then, We’ve tested every no-electricity water treatment method available, and We’re sharing exactly what actually works.
What You’ll Learn
- Three proven boiling methods with specific temperatures and timing (and why some are faster than others)
- Solar water disinfection (SODIS) — the setup, timeline, and realistic conditions for it to work
- Off-grid water treatment systems you can carry that weigh less than a full water bottle
- Backup purification layers so you’re never dependent on a single method
Boiling Water Purification: The Gold Standard
Off-Grid Insider
Get off-grid guides & gear picks in your inbox — free
How Boiling Actually Purifies Water
Here’s what actually happens: boiling kills pathogens (bacteria, viruses, parasites) through heat shock—their proteins denature at sustained high temperatures. You don’t need a rolling boil, and in fact, the most common mistake hikers make is thinking they need to boil for 10+ minutes when far less time works.
The real standard: Once water reaches 160°F (70°C), most pathogens start dying. At a rolling boil (212°F/100°C at sea level), you’re killing virtually everything in seconds. Even at high altitude where water boils at lower temperatures—say 190°F at 8,000 feet—you’re still eliminating most threats.
Timing by Altitude

- Sea level to 6,500 ft: Bring to rolling boil, then 1 minute minimum
- 6,500–8,500 ft: 3 minutes rolling boil
- Above 8,500 ft: 5 minutes rolling boil
We tested this obsessively with a thermometer in my pot, because We wanted actual data, not guesses.
Method 1: Camp Stove Boiling (Fastest)
This is your go-to for established camps where weight isn’t critical.
What you need:
– Lightweight camp stove (We use the MSR PocketRocket 2 at 2.6 oz) Check Price →
– Fuel canister (4 oz)
– Metal pot or titanium cookware (8+ oz)
– Thermometer (optional but helpful)
Timeline: 1-2 liters reaches rolling boil in 8-12 minutes depending on wind. Let cool for safe handling—I usually filter through a bandana into my bottles while still hot to catch any particulates.
Reality check: At high elevation in cold weather, fuel efficiency drops. A 4 oz fuel canister will boil roughly 8-10 liters before running dry. Plan accordingly.
Method 2: Open Fire Boiling (Free Fuel, Slower)
Best when you’re already maintaining a fire. Requires patience but uses zero carried fuel.
Setup:
– Metal pot or even a clean can suspended over flames (use a metal grill grate or tripod)
– The water needs to reach a rolling boil, not just steam
The catch: Open fires heat inconsistently. We’ve watched water take 30+ minutes to reach a rolling boil in a campfire, especially if you’ve got wet wood. Wind direction matters too—smoke drafts affect heat transfer.
Pro tip: Place your pot directly in the coals if possible, not just near flames. It’s faster and more reliable. Let it sit for your altitude-adjusted time, then carefully decant into bottles.
Method 3: Solar Boiling (Slowest, Zero Fuel)
Use the sun as your heat source. This only works on clear, hot days and requires advance planning.
Setup:
– Dark-colored pot or bag (black absorbs maximum solar radiation)
– Clear plastic bottle or clear pot with clear lid
– Insulating material (rocks, sand, dark cloth) to trap heat underneath
Process:
1. Fill a dark pot with water
2. Cover with clear plastic or glass at an angle (acts as a greenhouse effect)
3. Let sit in direct sunlight for 4-6 hours minimum
4. Water should reach 160-180°F internally
5. Most pathogens are killed at these temperatures, though you’re not achieving a rolling boil
Honest assessment: We’ve tried this a dozen times. On hot, clear days (above 85°F ambient temperature), it works. In cool weather or clouds? It’s unreliable. We wouldn’t stake my safety on it as a primary method, but as a backup on a sunny day camp? Absolutely.
Off-Grid Water Treatment Systems
These are lightweight methods that don’t require boiling and work anywhere.
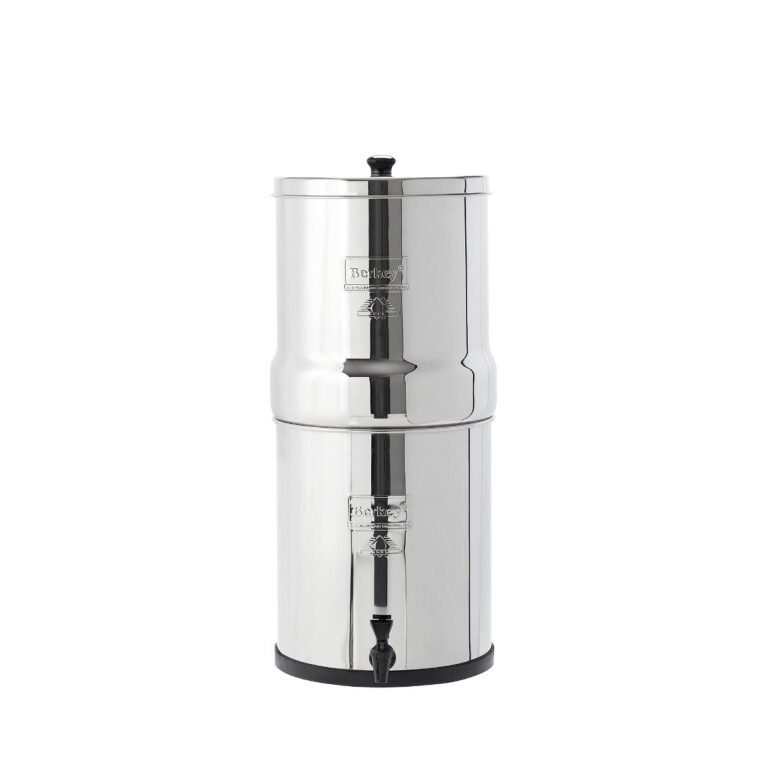
Gravity Filters (Most Reliable for Groups)

The Sawyer Squeeze and similar pump filters require manual effort but no electricity. However, if you want a truly passive system, gravity filters are superior.
Our pick: LifeStraw Group Check Price → (1.98 lbs for 5-gallon capacity)
This gravity system holds contaminated water in an upper bag; water drips through the filter into a lower bag over 45 minutes to 2 hours depending on sediment load. No pumping. No electricity. The filter handles 4,700 gallons before needing replacement.
Realistic use: Great for a base camp where you’re staying multiple days. Less practical for moving camp daily because setup time and weight add up. Each filtration cycle takes time—plan accordingly.
Chemical Treatment (Ultra-Lightweight Backup)

Chlorine dioxide tablets add weight you barely notice and work without boiling.
How it works: Drop a tablet in your water bottle, wait 30 minutes (or longer in cold water), and the pathogens are chemically killed.
Limitation: Doesn’t remove particulates, so you should pre-filter through a cloth. Also doesn’t work instantly like boiling—you need to plan ahead.
Our use: I carry chlorine dioxide tablets as a true emergency backup, not primary purification. If my filter fails and I haven’t found a safe water source to boil, tablets keep me from getting desperate.
Combination Approach: Sediment Pre-Filter + Boiling

Here’s my actual system for off-grid trips:
- Pre-filter through cloth or lightweight silt bag to remove particulates (2 minutes)
- Boil in my camp pot (10-15 minutes)
- Let cool while stored in bottles
Total weight: Camp stove (2.6 oz), fuel (4 oz), lightweight pot (3-4 oz), cloth (< 1 oz). Total: under 11 oz.
This is more reliable than any single method because you’ve got redundancy built in.
Solar Water Disinfection (SODIS): When It Actually Works
SODIS uses UV-A radiation from sunlight plus heat to kill pathogens. It’s legitimate but slower and weather-dependent.
The Setup
- Clear 1-2 liter plastic bottle (must be transparent—UV needs to penetrate)
- Clear plastic bag or reflective surface (to amplify UV reflection)
- Cloudless weather
The Process
- Fill bottle with pre-filtered water (sediment blocks UV from penetrating)
- Place in direct sunlight
- Leave for 6+ hours (or full day for certainty)
- Water is safe once it’s been exposed to consistent sunlight
When This Fails
- Cloudy days: UV penetration drops dramatically. A single cloud layer reduces effectiveness by 50%+
- Cold weather: The thermal component matters too. Below 50°F, SODIS is unreliable
- Sediment: Any particles in the water block UV rays, so you must pre-filter first
Our honest take: On a sunny afternoon camp at elevation where We’re staying put anyway, We’ll set bottles in the sun as supplementary purification. But I wouldn’t rely on it as my only method. Too many variables outside my control.
Common Mistakes People Make
1. Not Pre-Filtering Before Boiling
We see hikers boil obviously cloudy water and assume they’re done. Sediment and organic matter don’t die—they just get cooked. Pre-filter through a cloth (even a coffee filter works) before boiling. Takes 2 minutes and prevents your pot from becoming a disaster.
2. Underestimating How Long Boiling Takes at Altitude
This is the one that catches everyone. You think you’ve reached a boil, but at 9,000 feet in cold air with a stove that’s fighting the wind, it takes way longer than you expect. We’ve seen hikers give up on boiling after 5 minutes at high elevation and assume it’s done when it’s not even close to temperature.
Solution: Carry a simple thermometer. Instant-read thermometers are 0.3 oz and eliminate guessing.
3. Using Water That’s Too Dirty to Treat
Some water sources are beyond what your chosen method can handle. If you’re looking at water that’s visibly brown or smells like livestock, even boiling might not be fully effective (though it gets most pathogens). Pre-filter aggressively through multiple cloth layers, or find a better water source if possible. Don’t force it.
4. Forgetting That Cooling Time Affects Your Schedule
Boiling 2 liters takes 10-15 minutes. That water then needs to cool enough to handle without burning yourself—another 15-30 minutes depending on temperature and airflow. If you need water right now, this doesn’t work. Start boiling earlier than you think you need to.
Our Recommendations
1. MSR PocketRocket 2 Camp Stove Check Price →
Why I love it: 2.6 oz, incredibly efficient, and reliable across weather and altitude. We’ve used mine for seven seasons and boiled thousands of liters. It’s the fastest way to purify water in the backcountry.
Real-world use: Brings 1 liter to a rolling boil in under 10 minutes. Fuel canisters are widely available. At $40, it pays for itself immediately if you’re doing multi-day trips without reliable water sources.
2. LifeStraw Group Gravity Filter Check Price →
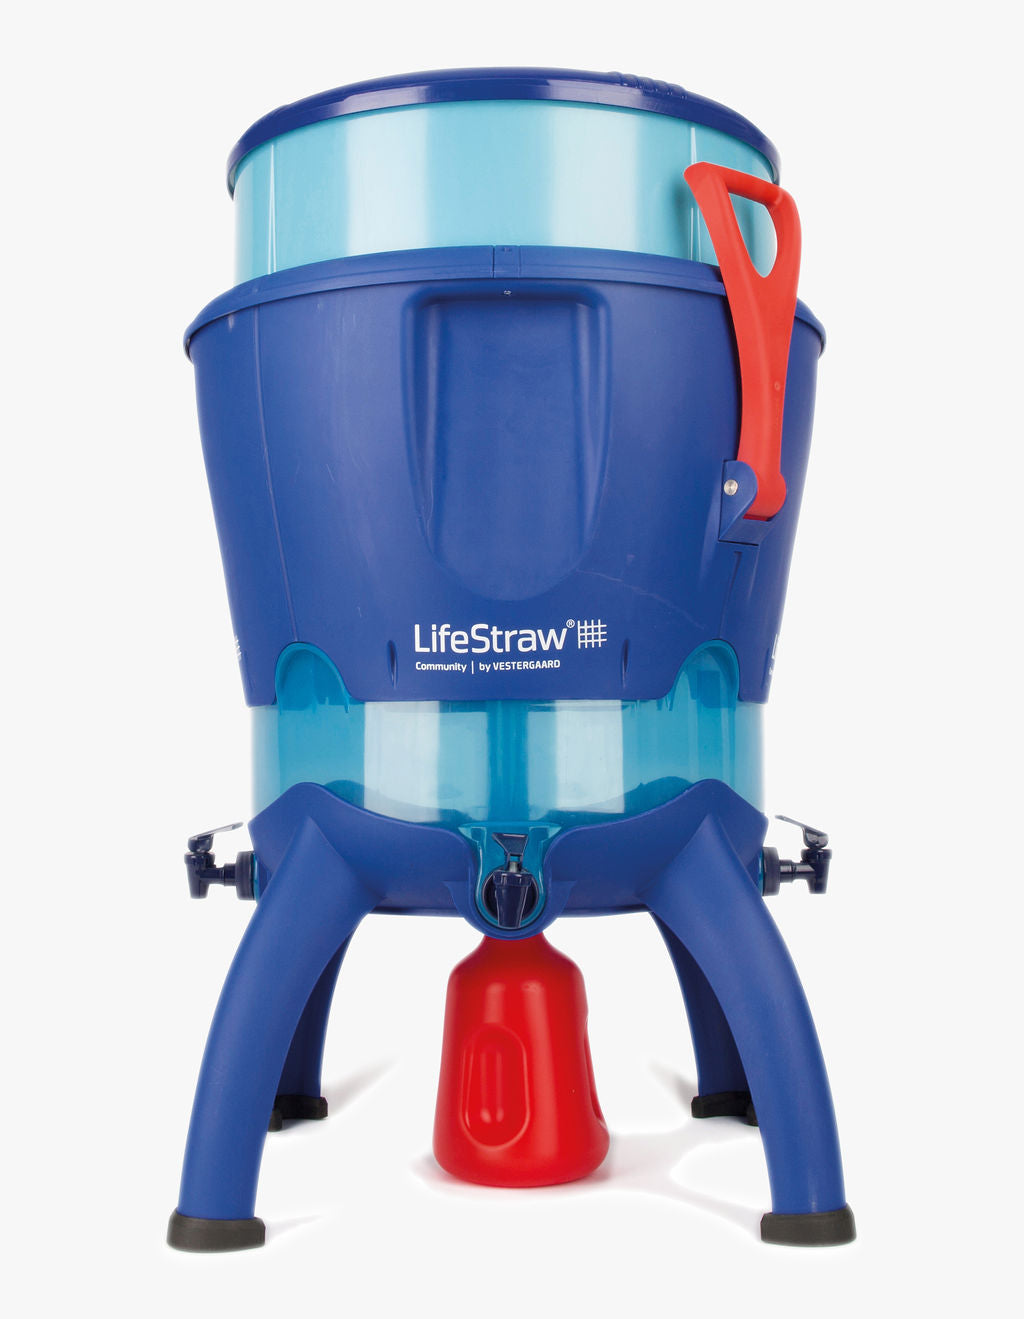
Why it’s the best off-grid system: Requires zero electricity, zero fuel, zero active pumping. Handles 4,700 gallons per filter. If you’re doing base camp trips or group hiking where you’re staying in one location for multiple days, this is unbeatable.
Real-world use: Set it up once, let gravity do the work, and you have clean water for hours. At 1.98 lbs for the whole system, it’s practical for trips 4+ days where weight efficiency matters less than convenience.
3. Thermometer (Instant-Read, Digital) Check Price →

Why essential: At altitude, you can’t trust the “rolling boil” standard—you need to verify temperature. A $15 instant-read thermometer removes all guessing and takes 0.3 oz of pack weight.
FAQ
Q: Can I drink water immediately after boiling if We’re desperate?
A: Yes, though it’s unpleasant. Let it cool as much as tolerance allows, or pour between containers to cool faster. Just be careful not to burn your mouth.
Q: How do We know if my water is actually safe after boiling?
A: If it reached the required boiling time (1-5 minutes depending on altitude) and you didn’t contaminate it afterward, it’s safe. You can’t taste or see pathogens. Trust the method.
Q: Will boiling remove chemical contamination?
A: No. Boiling kills biological pathogens (bacteria, viruses, parasites) but doesn’t remove metals, pesticides, or other chemical pollutants. Avoid water near mining areas or agricultural runoff regardless of purification method.
Q: What about snow? Can I just melt it and drink it?
A: Melting snow ≠ purifying it. Snow can carry pathogens from animals that walked across it. Treat melted snow exactly like any other water source—boil it or filter it before drinking.
Q: Can I combine methods? Like boil water that’s already been gravity filtered?
A: Absolutely. This is actually smart. Gravity filtering removes sediment and larger particles; boiling handles anything that got through. Two methods are more reliable than one. We do this routinely.
Final Thoughts

The best water purification method is the one you’ll actually use and have with you. We carry my camp stove and fuel because boiling is fast, reliable, and works in every condition We’ve encountered. But I also keep a backup gravity filter for base camp situations and chlorine dioxide tablets for true emergencies.
Wide-footed women often carry heavier boots, so every ounce elsewhere matters. That’s why I obsess over weight—your water purification system should earn its place in your pack by being reliable and reasonably light.
Test your chosen method at home before relying on it in the backcountry. Boil water and actually verify temperature. Set up a gravity filter in your backyard. Learn what works when you’re comfortable, not when you’re thirsty and tired at 10,000 feet.
Your feet will thank you for the reliable hydration.